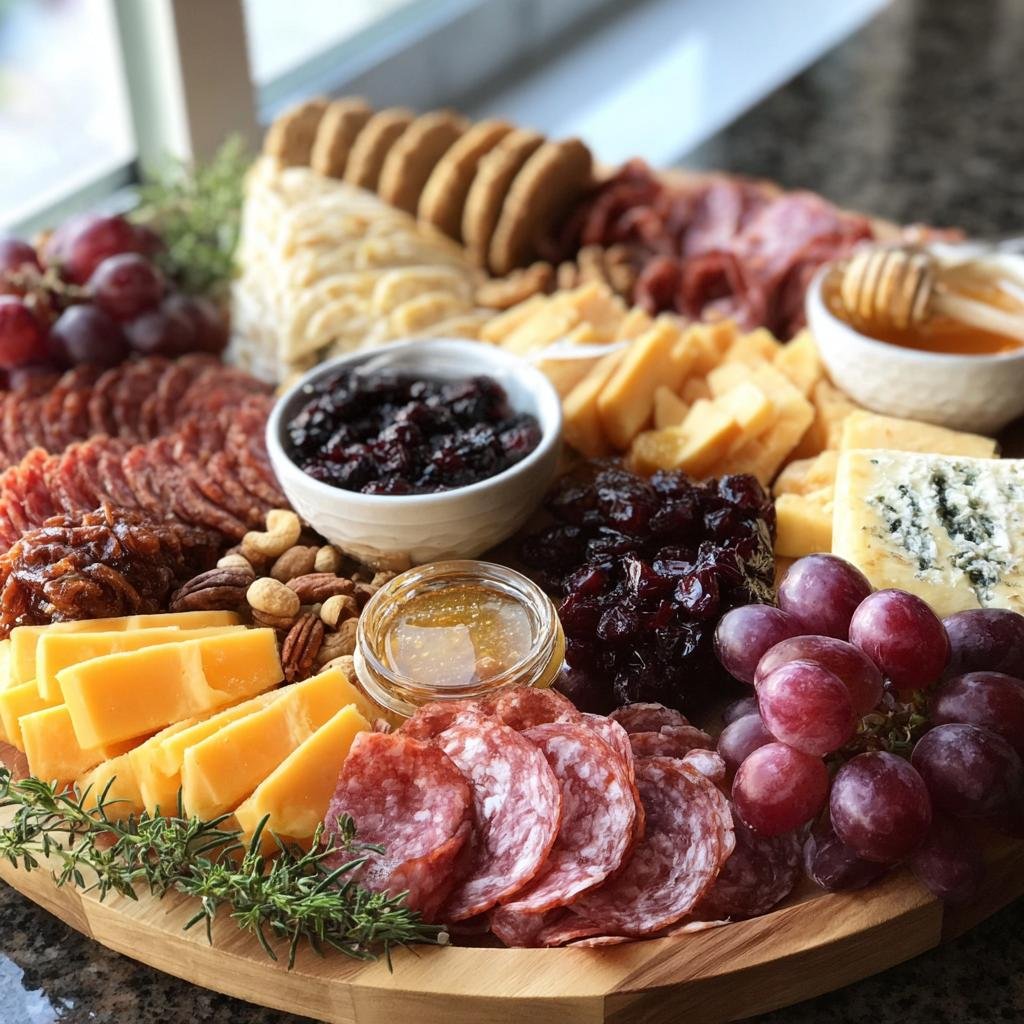
You know that moment when your Thanksgiving guests start arriving and you’re still frantically trying to get everything on the table? That was me every year until I discovered the magic of Thanksgiving charcuterie boards. Now, I always have this stunning, delicious spread ready before the first relative even rings the doorbell. The best part? These creative tips make it so easy – no cooking required! Just pile gorgeous cheeses, meats, and seasonal treats artfully on a board, and suddenly you look like the most put-together hostess. Trust me, once you try this stress-free appetizer, you’ll never go back to last-minute kitchen chaos.

Why You’ll Love These Thanksgiving Charcuterie Boards Creative Tips
Let me tell you why this is my go-to holiday lifesaver:
- No-stress prep: Throw it together in 20 minutes flat while the turkey roasts
- Total crowd-pleaser: Even picky eaters find something to love
- Customizable magic: Swap ingredients based on what’s fresh or what your family prefers
- Showstopper looks: Makes your table look professionally styled (I’ll never admit how easy it really is!)
- Time-saver: Assemble it hours before guests arrive
Seriously, it’s the easiest way to impress your guests while keeping your sanity intact.
Ingredients for Your Thanksgiving Charcuterie Board
Here’s the golden rule for an amazing charcuterie board: quality over quantity! You don’t need a million ingredients, just a few really good ones. After years of trial and error (and many happy Thanksgiving guests), here’s my perfect shopping list:
- 1 lb assorted cured meats: My must-haves? Salami (the kind that rolls into cute little rosettes), paper-thin prosciutto, and some roasted turkey slices for that Thanksgiving touch. The variety makes it fun!
- 1/2 lb assorted cheeses: I always include a sharp cheddar (aged at least 2 years), a creamy brie (let it sit out to get oozy – so good!), and smoked gouda for that fall flavor.
- 1 cup mixed nuts: Toasted almonds add crunch, walnuts feel seasonal, and pecans? Pure Thanksgiving magic. Just toss them in the oven for 5 minutes to wake up their flavor.
- 1 cup dried fruits: Apricots (cut in half so they’re easy to grab), quartered figs, and tart cranberries give that perfect sweet-savory balance.
- 1/2 cup olives & pickles: The briny bites that cut through all that richness. Castelvetrano olives are my favorite – they’re buttery and not too salty.
- 1 cup fresh fruits: Grapes (leave them on the vine for pretty presentation), thin apple slices, and maybe some pear if I’m feeling fancy.
- Dips & spreads: 1/2 cup honey or fig jam for drizzling, and 1/2 cup grainy mustard for that perfect tang.
- The finishing touches: Fresh rosemary and thyme sprigs (they smell amazing and look so festive!), plus an assortment of crackers and breadsticks for scooping.
Pro tip from many messy Thanksgivings: pull your cheeses and meats from the fridge about 30 minutes before assembling. Nothing beats the flavor and texture at room temperature!
How to Assemble Your Thanksgiving Charcuterie Board
Okay, here’s where the real fun begins! Assembling a charcuterie board is like edible art – don’t overthink it, just follow these simple steps and you’ll create something gorgeous. The secret is building in layers and leaving some “breathing room” between items so everything looks inviting rather than crowded.
Step 1: Choose the Right Board
First things first – grab the perfect canvas! I’ve used everything from rustic wooden cutting boards (my personal favorite – that natural look screams Thanksgiving) to sleek slate or even a pretty ceramic platter in a pinch. Size-wise, aim for something that gives you about 1 square foot per person – a big 18×24 inch board works great for most gatherings. Just make sure it has a slight rim or lip so those precious olives don’t go rolling onto Aunt Linda’s lap!
Step 2: Arrange Cheeses and Meats
Now for the main attractions! Place your cheeses first – I like to space them out in triangles across the board. Cut some into cubes or slices (leave a knife nearby for soft cheeses), and keep others whole for variety. Next comes the meats – fold prosciutto into those fancy ruffles (just drape it over your finger and let it curl naturally), roll salami into little rosettes, and fan out turkey slices. Alternate colors and textures – a dark salami next to pale prosciutto makes everything pop!
Step 3: Add Fruits, Nuts, and Extras
Time to fill in all those beautiful gaps! Cluster dried apricots near the brie (they’re best friends), scatter nuts in little piles, and tuck fresh grapes cascading off the edge. Small bowls are perfect for messy items – I use mini mason jars for honey and mustard. Pro tip: put olive pits in one bowl and pitless olives in another so guests can choose. The colors alone will make your board Instagram-worthy before you even add the finishing touches!
Step 4: Garnish and Final Touches
This is where the magic happens! Tuck fresh rosemary sprigs between cheeses (they smell amazing and look so festive), add some thyme for texture, and arrange crackers and breadsticks around the edges like a delicious frame. Take a step back – if you see any empty spots, fill them with a few extra nuts or fruit slices. The final test? If you catch yourself wanting to dive in immediately, you’ve nailed it! Let it sit for about 15 minutes before serving so all those flavors can mingle beautifully.
Thanksgiving Charcuterie Boards Creative Tips for Success
After making more charcuterie boards than I can count (and learning from all my mistakes!), here are my can’t-miss tips:
- Think seasonally: Swap summer berries for roasted squash slices or pomegranate seeds – instant Thanksgiving vibes!
- Prep smart: Chop nuts, slice apples, and portion dips the night before – assembly takes 10 minutes day-of.
- Portion perfectly: Allow about 3oz meats and 2oz cheeses per person for a starter (double for a main).
- Color magic: Arrange orange persimmons next to green grapes and purple figs – it’s edible fall foliage!
- Foolproof layout: Start with largest items first, then fill gaps – it always looks professionally designed.
The best tip? Have fun with it! There’s no wrong way to make people happy with delicious food.
Ingredient Substitutions for Your Thanksgiving Charcuterie Board
Got dietary restrictions at your table? No problem – my Thanksgiving charcuterie board still works beautifully with these easy swaps:
- Vegan guests? Try nut-based cheeses (cashew brie is shockingly good!) and plant-based deli slices. Marinated mushrooms make a fantastic meat substitute.
- Gluten-free: Rice crackers or toasted baguette slices from GF bread work perfectly. Check labels on processed meats.
- Nut allergies: Roasted chickpeas or pumpkin seeds give that same satisfying crunch.
- Not a fan of strong cheeses? Mild havarti or fresh mozzarella are crowd-pleasers.
The key is keeping that balance of savory, sweet, crunchy and creamy – the flavors will still sing!
Serving and Storing Your Thanksgiving Charcuterie Board
Here’s my golden rule: charcuterie tastes best at room temp! I pull mine from the fridge 30 minutes before serving so the cheeses get oozy and flavors bloom. Need to prep ahead? Cover loosely with wax paper (plastic makes everything sweat) and refrigerate up to 4 hours. Leftovers? Ha! Good joke – but if you somehow have any, wrap meats and cheeses separately and they’ll keep 2 days. Pro tip: refresh with new crackers before round two!
Nutritional Information for Thanksgiving Charcuterie Boards
Now, let’s be real – we’re not counting calories on Thanksgiving! But if you’re curious about what you’re nibbling on while waiting for the turkey, here’s the scoop. A standard serving (about 1/8th of your average board) will likely have around 350 calories, with a good mix of protein from the meats and cheeses, healthy fats from nuts, and some natural sugars from the fruits. That said, these numbers can swing wildly depending on whether you go heavy on the brie or light on the salami.
Remember: Nutritional values are estimates and vary based on specific ingredients and brands. The beauty of charcuterie is that you can customize it to fit any dietary preference – load up on veggies if you want lighter options, or indulge in extra gouda if that’s your holiday joy. My philosophy? Everything in moderation, especially during the holidays. After all, that rosemary-spiked salami isn’t going to eat itself!
FAQs About Thanksgiving Charcuterie Boards Creative Tips
How far in advance can I assemble my Thanksgiving charcuterie board?
You can prep components 1-2 days ahead (slice cheeses, portion nuts, wash grapes), but assemble just 1-2 hours before serving for best texture. I always set mine out as guests arrive so the cheeses get perfectly creamy!
What’s the perfect amount per person?
For a starter, plan 3-4oz total per guest (about 2 meats + 1 cheese serving). If it’s your main appetizer, bump to 5-6oz. My rule? Better to have leftovers than hungry relatives eyeing the turkey prematurely!
Can I make a kid-friendly version?
Absolutely! Skip the strong cheeses and add cubed cheddar, rolled turkey slices, pretzels, and apple “sandwiches” with peanut butter. I always include a small bowl of chocolate chips – makes it feel like a treasure hunt!
How do I keep my board looking fresh throughout the party?
Replenish crackers as they disappear and give cheeses a quick stir if they start drying out. I keep a “backup bowl” of extra grapes and nuts to refresh empty spots – no one will ever know!
What’s your #1 pro tip for first-timers?
Don’t stress about perfection! Some of my best boards happened when I just had fun with it. As long as there’s good food and happy guests, you’ve already won Thanksgiving.

20-Minute Thanksgiving Charcuterie Board Magic for Stress-Free Hosting
- Total Time: 20 minutes
- Yield: 8 servings 1x
- Diet: Low Lactose
Description
Learn how to make a creative Thanksgiving charcuterie board with these simple tips.
Ingredients
- 1 lb assorted cured meats (salami, prosciutto, turkey)
- 1/2 lb assorted cheeses (cheddar, brie, gouda)
- 1 cup mixed nuts (almonds, walnuts, pecans)
- 1 cup dried fruits (apricots, figs, cranberries)
- 1/2 cup olives
- 1/2 cup pickles
- 1 cup fresh fruits (grapes, apples, pears)
- 1/2 cup honey or jam
- 1/2 cup mustard or dip
- Fresh herbs (rosemary, thyme) for garnish
- Crackers or breadsticks
Instructions
- Choose a large board or platter.
- Arrange cheeses first, cutting some into slices or cubes.
- Fold cured meats and place them around the cheeses.
- Fill gaps with nuts, dried fruits, and fresh fruits.
- Add small bowls for honey, mustard, or dips.
- Scatter olives, pickles, and fresh herbs for color.
- Place crackers or breadsticks around the edges.
- Serve immediately or cover and refrigerate until ready.
Notes
- Use seasonal ingredients for a festive touch.
- Keep meats and cheeses at room temperature for best flavor.
- Customize with your favorite items.
- Prepare ahead to save time.
- Prep Time: 20 minutes
- Cook Time: 0 minutes
- Category: Appetizer
- Method: No-Cook
- Cuisine: American
Nutrition
- Serving Size: 1/8 of board
- Calories: 350
- Sugar: 10g
- Sodium: 600mg
- Fat: 25g
- Saturated Fat: 10g
- Unsaturated Fat: 12g
- Trans Fat: 0g
- Carbohydrates: 20g
- Fiber: 3g
- Protein: 15g
- Cholesterol: 50mg
Keywords: thanksgiving charcuterie board, holiday appetizer, easy entertaining
