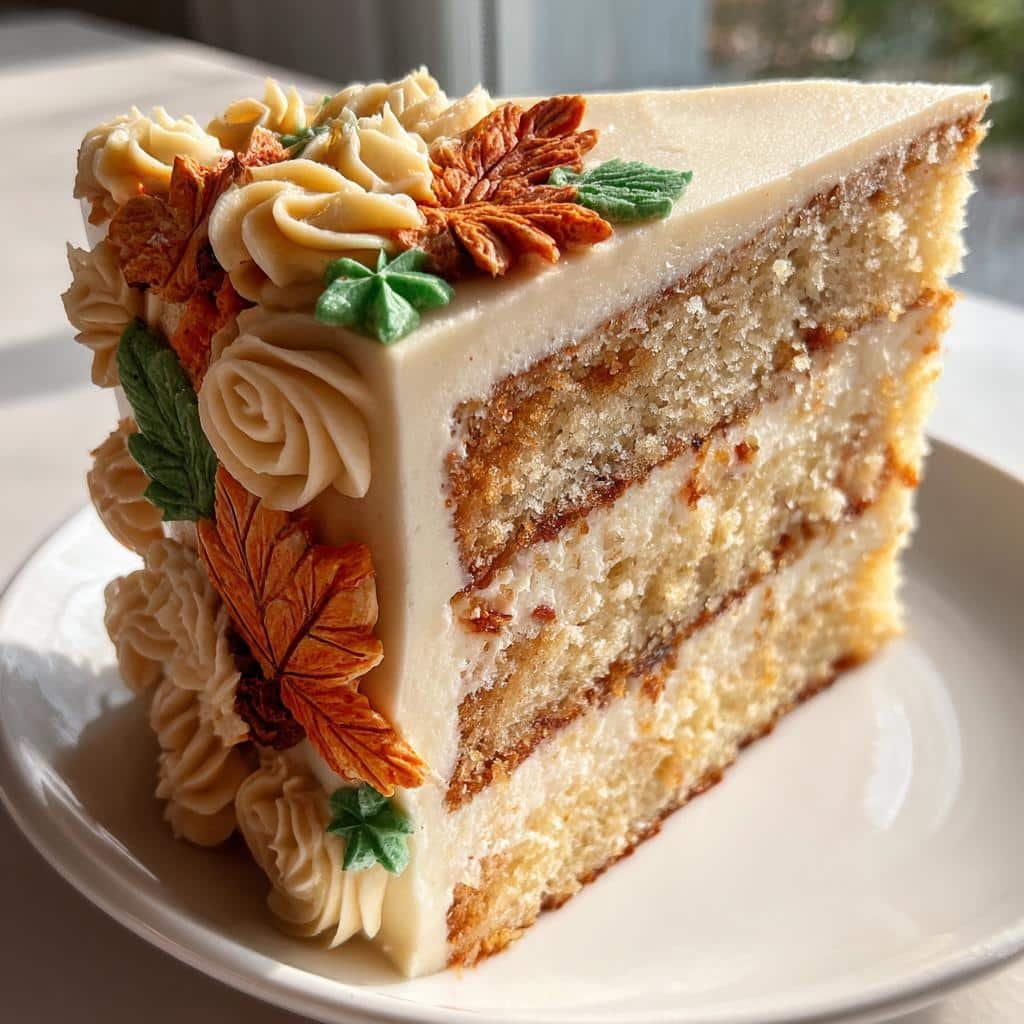
There’s something magical about decorating cakes for Thanksgiving – it’s like painting with frosting! Every year, I turn my kitchen into a mini bakery, creating festive designs that make everyone at the table smile. Whether you’re a beginner or seasoned baker, these Thanksgiving cake decorating ideas will help you create showstopping desserts without stress. My secret? Keeping things simple yet impactful with autumn colors and easy piping techniques. Trust me, even basic swirls and fondant leaves can transform a plain cake into a holiday masterpiece. The best part? You’ll have just as much fun making it as your family will eating it!

Why You’ll Love These Thanksgiving Cake Decorating Ideas
Let me tell you why these decorating tricks have become my go-to every November – they just work, whether you’re hosting twenty people or just want to treat yourself! Here’s what makes them special:
- Instant holiday magic: A few simple swirls of orange and brown frosting suddenly makes any cake feel festive. No fancy skills needed!
- Forgiving techniques: Messed up your piping? Just swipe it off with a spatula and try again – buttercream is wonderfully forgiving.
- Kid-friendly fun: My nieces love helping sprinkle on the edible autumn leaves (and “testing” the frosting, of course).
- Works with store-bought: Short on time? Use a pre-made cake and focus just on decorating – I won’t tell!
The real joy comes when you see everyone gathering around your creation, phones out to snap pictures before the first slice. That’s the Thanksgiving spirit right there!
Ingredients for Thanksgiving Cake Decorating
Gathering your ingredients is half the fun – like a mini Thanksgiving parade on your countertop! Here’s exactly what you’ll need to create those gorgeous autumn designs:
- 1 pre-baked cake (any flavor you love – spice cake is my holiday favorite)
- 2 cups buttercream frosting (divided into thirds for coloring – trust me, you’ll want those autumn hues!)
- Gel food coloring (orange, brown, and yellow – the gel kind gives the richest colors without thinning your frosting)
- Piping bags + tips (I always use Wilton tip #21 for leaves and a simple round tip for borders)
- Edible decorations (fondant leaves or autumn sprinkles – I stock up on these every November!)
Pro tip: Make extra frosting – you’ll want some for “quality control” tasting along the way!
Equipment You’ll Need
Don’t worry – you don’t need fancy gadgets to make a stunning Thanksgiving cake! Here’s my trusty toolkit (most of it probably hiding in your drawers already):
- Piping bags + couplers (disposable ones save so much cleanup time!)
- Wilton tip #21 (my secret weapon for perfect leaf designs)
- Offset spatula (that slightly bent metal one – makes smoothing frosting a breeze)
- Small paintbrushes (for blending food coloring or fixing little mistakes)
- Turntable (not essential, but oh-so-helpful for smooth piping)
See? Nothing too wild – just a few basics that’ll make your decorating feel like playtime rather than work!
How to Decorate a Thanksgiving Cake Step by Step
Alright, let’s get our hands messy and turn that plain cake into a Thanksgiving masterpiece! Follow these steps exactly how I do them every year – my family swears they can taste the love in every decorated bite.
Step 1: Prep the Cake
First things first – level that cake! I use a serrated knife to gently saw off any domed top (snack on the scraps – chef’s privilege!). Then comes the crumb coat: a thin layer of plain buttercream that seals in crumbs. Think of it like primer before painting – just a quick swipe with your offset spatula, then pop it in the fridge for 15 minutes to set.
Step 2: Color and Divide Frosting
Time for the fun part – autumn colors! I divide my buttercream into three bowls. For the orange, start with yellow gel food coloring, then add tiny drops of red until you get that perfect pumpkin hue. The brown needs just a touch of black gel to deepen it. Pro tip: Always add coloring gradually – you can darken but can’t lighten!
Step 3: Pipe Festive Designs
Now the magic happens! Load your piping bag with tip #21 and orange frosting. Hold the bag at a 45-degree angle, squeeze gently while pulling upward to form leaf shapes – they don’t need to be perfect, nature isn’t! Alternate with brown frosting for acorn designs using a round tip. Feeling fancy? Pipe a rustic border around the base – I do alternating dollops that look like little pumpkins. The secret? Relax your grip and let the frosting flow naturally.
Step 4: Add Final Touches
Almost done! Sprinkle on those fondant leaves (I cluster mine in one corner like they blew onto the cake) or autumn-colored sprinkles. For extra wow factor, dust lightly with edible gold powder – it catches the candlelight beautifully! One last chill (10 minutes max) and your Thanksgiving showstopper is ready to impress.
Tips for Perfect Thanksgiving Cake Decorating
After years of (sometimes messy) Thanksgiving cake experiments, I’ve learned a few tricks that make all the difference between “oh no” and “oh wow!” Here are my can’t-live-without decorating secrets:
- Practice piping on parchment first – I always test new designs on paper before touching the cake. Saves so much frustration!
- Keep frosting at room temp – Too cold and it’s stiff, too warm and it melts. I aim for peanut butter consistency.
- Embrace imperfections – Slightly uneven leaves? Call them “rustic charm!” Thanksgiving is about joy, not perfection.
- Work top to bottom – Decorate the sides last to avoid smudging your beautiful top designs.
- Chill between layers – Just 10 minutes in the fridge sets each step and prevents color bleeding.
Remember – even my first attempts looked like abstract art. The important part is having fun with it!
Thanksgiving Cake Decorating Variations
Who says you have to stick to traditional buttercream? One year I ran out of orange food coloring and discovered the most gorgeous alternative – melted chocolate drizzled over white frosting looks like autumn tree branches! Here are my favorite twists:
- Chocolate lovers: Swap half the buttercream for chocolate ganache – pipe it like tree trunks with candy corn “leaves”
- Fruit-forward: Arrange sliced persimmons or pears in a sunflower pattern (brush with honey to make them glisten!)
- Spiced twist: Mix cinnamon and nutmeg right into white frosting for a speckled “pumpkin spice” effect
The best part? These variations still feel festive while letting your creativity shine through!
Serving and Storing Your Decorated Cake
Here’s how I keep my Thanksgiving cakes looking (and tasting!) their best: If not serving immediately, pop it in the fridge uncovered for 15 minutes to set the decorations, then loosely tent with plastic wrap. Bring to room temperature 30 minutes before slicing – cold buttercream doesn’t do those beautiful designs justice! For leftovers (ha!), store in an airtight container for up to 3 days – if it lasts that long!
Nutritional Information
Just so you know, these numbers can vary based on your specific ingredients and brands. But for a general idea, one slice of this decorated Thanksgiving cake averages about 350 calories with 15g of fat. Not bad for a holiday treat!
Frequently Asked Questions
Over the years, I’ve gotten the same great questions from friends and family about Thanksgiving cake decorating. Here are the answers that’ll save you some trial-and-error!
Can I use store-bought frosting?
Absolutely! I’ve used canned frosting in a pinch – just whip it for a minute with your mixer to make it fluffier. The decorator’s secret? Add a tablespoon of powdered sugar per cup to stiffen it for piping.
How do I fix broken frosting colors?
Oops! If your orange turns out too neon, mix in a tiny bit of brown to soften it. Frosting too thin? More powdered sugar. Too thick? A teaspoon of milk at a time until it’s just right.
Can I decorate the cake a day ahead?
You bet! Just wait to add any fresh fruit or delicate sprinkles until a few hours before serving. The buttercream acts like a tasty preservative.
What if I don’t have piping tips?
No worries! A plastic bag with the corner snipped works fine. For leaves, just snip the corner at an angle and pipe teardrop shapes – rustic charm!
Share Your Thanksgiving Cake Creations
I’d love to see your festive cake masterpieces! Snap a photo of your Thanksgiving creation and tag me – nothing makes me happier than seeing your edible works of art. Got decorating questions? Ask away! We’re all learning together in this delicious holiday tradition.
Print
3 Easy Thanksgiving Cake Decorating Ideas to Wow Guests
- Total Time: 20 minutes
- Yield: 1 decorated cake 1x
- Diet: Vegetarian
Description
Learn how to decorate cakes for Thanksgiving with simple yet festive designs.
Ingredients
- 1 pre-baked cake (your choice of flavor)
- 2 cups buttercream frosting
- Food coloring (orange, brown, yellow)
- Decorating tools (piping bags, tips, spatula)
- Edible decorations (fondant leaves, sprinkles)
Instructions
- Prepare your cake by leveling and frosting it with a thin crumb coat.
- Divide the buttercream into portions and color them for autumn themes.
- Pipe borders or designs using different tips for texture.
- Add fondant leaves or sprinkles for a festive touch.
- Chill the cake briefly to set the decorations before serving.
Notes
- Use gel food coloring for vibrant shades.
- Practice piping designs on parchment paper first.
- Keep decorations simple for beginners.
- Prep Time: 20 minutes
- Cook Time: 0 minutes
- Category: Dessert
- Method: Decorating
- Cuisine: American
Nutrition
- Serving Size: 1 slice
- Calories: 350
- Sugar: 25g
- Sodium: 200mg
- Fat: 15g
- Saturated Fat: 8g
- Unsaturated Fat: 6g
- Trans Fat: 0g
- Carbohydrates: 50g
- Fiber: 1g
- Protein: 3g
- Cholesterol: 30mg
Keywords: thanksgiving cake, cake decorating, holiday desserts
